Sheet Revisions
- General Overview
- Tips and Tricks
- Related Tools
Sheet revisions
Disable automatic creation of BASE drawings: ![]() or
or ![]() . This option applies to member details, submaterial details, and erection view drawings.
. This option applies to member details, submaterial details, and erection view drawings.
|
If you Open Archived Drawing, one of the drawings you can then select might be a base drawing. The characters _BASE in this example indicate that the file is a base drawing. See scenario 2. |
If this box is checked (
), you need to create a base drawing manually if you want automatic detailing to cloud revision changes when you auto detail members, submaterials or erection views. Manual creation of base drawings can be done for these and other drawing types using the Change option Create Base Drawings. This helps to minimize the disk space taken up by your current Job.
If the box is not checked (
), base drawings are automatically created when members, submaterials or erection views are placed on detail sheets using Sheet Item Add, Detail Sheet Autoloading, Gather Sheet Autoloading. Automatic creation of base drawings is also done for each member detail on a sheet when you Lock ... during an Edit Revision Chart, or when you Lock sheet revision chart during printing, or when you Increment Sheet Revisions.
Why have base drawings? Base drawings make automatic revision clouding of drawings possible. When
Detail with revisions Detail Members Detail with revisions Detail Submaterial Detail with revisions Detail Erection Views Manual creation of base drawings: You can manually create a base drawing by running Create Base Drawing while viewing a member detail. This can be done even when automatic creation of base drawings is disabled.
Also see: The Change option Create Base Drawings can be used to create base drawings even when the automatic creation of them is disabled. The Delete Project Items utility can be used to remove base drawings and archived drawings from your current Job.
Disable automatic creation of ARCHIVED drawings: ![]() or
or ![]() . This option applies to member details, submaterial details, and erection view drawings.
. This option applies to member details, submaterial details, and erection view drawings.
|
If you Open Archived Drawing, you will get a list of archived drawings. In this example, drawing 6_rev3 is a copy of 6_BASE. The drawings 6_rev0 and 6_rev1 and 6_rev2 are copies of previously created base drawings. See scenario 1. |
If this box is checked (
If the box is not checked (
6_BASE
New base drawings are created automatically, and each time a new base drawing is created, it replaces the old base drawing, and an archived copy (_rev drawing) of the new base drawing is also created. The archived _rev drawings are maintained as records of previous base drawings.
Each drawing has only one (or none) automatically created archived drawing associated with it. That one archived drawing is the base drawing. Each time a new base drawing is automatically created, it replaces the old base drawing.
An archived drawing will be created automatically along with the base drawing when you manually Create Base Drawings. Also see: Archive Current Drawing can be used to create an archived drawing even when automatic creation of archived drawings is disabled. The Delete Project Items utility can be used to remove base drawings and archived drawings from your current Job.
Revision annotations
Modify bill of material: Leave minimum information or Leave completely blank or Remove. This applies to detail sheets and the member bills of material when the box is checked for Detail with revisions during Detail Members. It only applies if a material is deleted from the bill of material.
|
Leave minimum information keeps the reference to the minor mark of the material on the bill of material. |
|
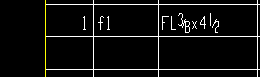
Leave completely blank leaves the affected line on the bill of material completely blank. |
|
Remove deletes all information on the affected line and moves the next line up to that line. |
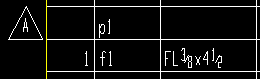
| For the examples above, the Plot Order for Revision was set to Prefix -- and this is the reason that delta symbols are shown next to lines in the bill that have been altered. |
Method to be used for clouding changes on details: Cloud each change or Group changes tightly or Group changes loosely. This applies when Detail with revisions is selected during Detail Members and the detail being generated is different than the base drawing. A base drawing is created automatically when a member detail is placed on a sheet and for member details already on a sheet when a revision chart is locked. Users can also create new base drawings.
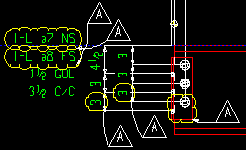
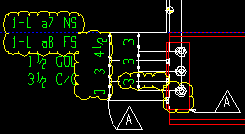
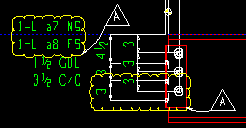
The following three examples show the effect of increasing the number of rows of bolts in the clip angles from two to three.
|
Cloud each change draws a cloud around each item in the current drawing that was different in the base drawing. Each cloud is identified with a delta symbol (a triangle) with the revision inside of it. |
|
Group changes tightly draws L-shaped and T-shaped clouds around groups of items that have changed on the drawing. Fewer delta symbols are used than when you Cloud each change. |
|
Group changes loosely draws rectangular clouds around groups of items that have changed on the drawing. The clouds are more likely to include items that have not changed. |
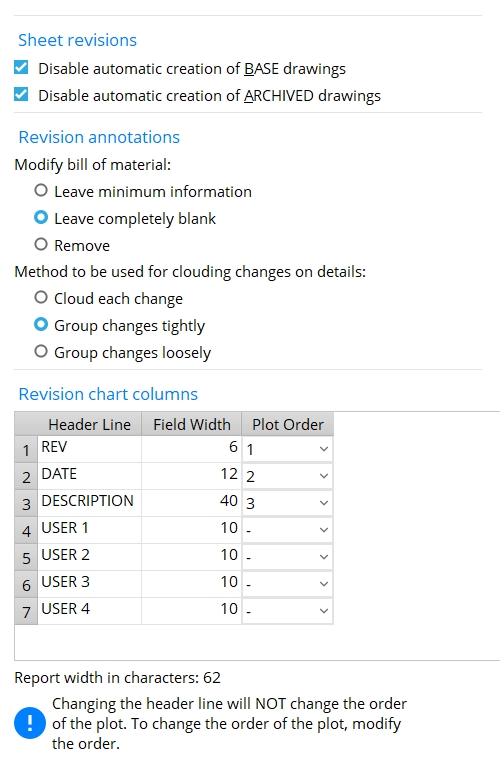
Revision chart columns
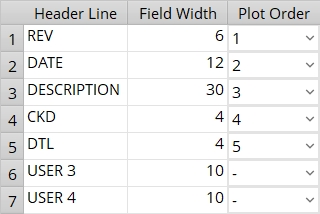
Header Line: The text you want for a particular column in the revision chart. You can type over the current header line with any number of characters up to the Field Width number.
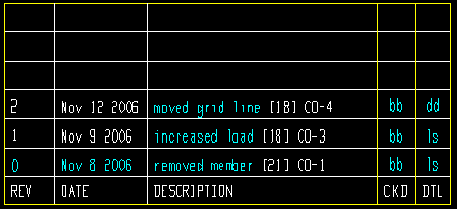
Example: The Header Line for the first column in the example of the revision chart shown above is REV.
Field Width: The number of characters that you want an individual column to be wide. Two characters (one at the beginning, the other at the end) are added automatically to create margins for each column (see Report width in characters). Be aware that if you do not allocate enough space for an entry that is made to a column, that entry overwrites into the next column.
Warning: Changing the Field Width affects the spacing of data in revision charts that are already on sheets.
Example 1: In the example shown below, the Field Width is 6 for the REV column, 12 for DATE and 30 for DESCRIPTION. As a result, Place Revision Chart generates a chart with a DESCRIPTION column that is two and a half times as wide as the DATE column, which in turn is twice as wide as the REV column.
Example 2: To Field Width you enter 6 for the REV column, 5 for the DATE column and 13 for the DESCRIPTION column. After you Place Revision Chart on a sheet, you Increment Sheet Revisions for that same sheet and press OK without changing the defaults. The result is that today's date (Nov 9 2006) overwrites into the DESCRIPTION column as illustrated below:
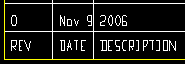

don't let this happen to you!
Plot Order: Inactive (-) or 1 or 2 or 3, etc. Inactive (-) prevents a column from appearing on the revision chart. 1 or 2or 3, etc. sets the order in which the column appears on the revision chart. 1 is the leftmost column, 2 is the second column from the left, and so on ...
Warning: Changing the Plot Order affects the spacing of data in revision charts that are already on sheets.
Example 1: 2 is the Plot Order for the DATE column in the example shown above. Therefore, DATE is the second column from the left.
Example 2: Inactive is the Plot Order for the USER 3 and USER 4 columns in the example shown above. Therefore, USER 3 and USER 4 columns do not appear on the chart that is generated using Place Revision Chart.
REV: Entries to this column on the revision chart can be alphabetical or numerical, depending on the selection made to Increment sheet revision when you Increment Sheet Revisions. For example, if you select Numerically for Increment sheet revision, the number 0 is entered to this column the first time you Increment Sheet Revisions, and the number 1 is entered the next time. Also, if the box is checked for Locked ... in the sheet revision editor, auto detailing automatically enters the next letter or number to this column if a member detail on the sheet is changed as a result of re-detailing with the box checked for Detail with revisions.
DATE: When you Increment Sheet Revisions, the default entry made to this column on the revision chart is today's date in the form of "month day year" (Nov 8 2006). Also, if the box is checked for Locked ... in the sheet revision editor, Automatic detailing enters the date here along with the new revision in the REV column if a member detail on the sheet is changed as a result of re-detailing with the box checked for Detail with revisions.
DESCRIPTION (member details only): The Short revision description in Member Status Review is entered to this column on the revision chart during Detail Members if the box is checked for Detail with revisions and the detailed member appears on the sheet with that revision chart and the current short revision description has changed since the member was last detailed.
DESCRIPTION (regardless of drawing type): The entry made to Revision description during Increment Sheet Revisions appears in this column.
USER 1 or USER 2 or USER 3 or USER 4: USER 1 was changed to CKD in the example below. USER 2 was changed to DTL in that same example. If you don't want one of these columns to appear on the revision chart, set the Plot Order to Inactive (- for USER 3 and USER 4 in the example above). Entries can be made to these columns using Sheet Revision Chart Editor (while on the sheet that the chart is placed on) or by using Increment Sheet Revisions while in Modeling or the Drawing Editor.
Report width in characters: The total number of characters that the revision chart will be wide. This number is automatically calculated from the Field Width assigned to columns on the revision chart for which a Plot Order of 1 or greater has been assigned. Two characters are added for each column in the chart (one space at the beginning, the other at the end) to create margins for separating the columns in the report. Making a particular column on the report Inactive decreases the chart width. Assigning a Plot Order number to a column that was formerly Inactive increases the chart width.


|
|
OK (or the Enter key) closes this screen and applies the settings.
Cancel (or the Esc key) closes this screen without saving any changes.
Reset undoes all changes made to this screen since you first opened it. The screen remains open.
- Settings applied to the Sheet Revisions screen are stored in your current Fabricator. When you Change Fabricator, you change to a different collection of settings, and the setting for this screen in that Fabricator may be different then the settings on this screen for your current Fabricator.
-
Warning: Changing the Field Width or number of columns (using Plot Order) affects the spacing of data in revision charts that are already on sheets.
-
Example and headings on a revision chart:
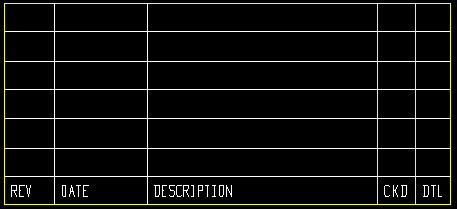
A revision chart without any entries made to it:
Choices made in Sheet Revisions for the chart above:
Same revision chart after Increment Sheet Revisions and after details on the sheet were re-detailed with the box checked for Detail with revisions. The cyan-colored lettering was entered using Sheet Revision Chart Editor, but could have also been entered with Increment Sheet Revisions.
- Drawing Presentation > Revision Chart (additional setup options for revision charts)
- Sheet Revisions edit window (lets you alter the layout of an individual revision chart)
- Place Revision Chart (to put a revision chart on a sheet or sheet outline)
- Sheet Revision Chart Editor (to edit data compiled into a revision chart on an individual sheet)
- Increment Sheet Revisions (to edit charts on multiple detail sheets)
- Detail with revisions (option for Detail Members)

